Make Good Design Easier in the Software You Use Everyday: Theme fonts and colors in Microsoft Word, Excel, and PowerPoint
As much as I advocate for the use of design software like Adobe InDesign, Photoshop, AutoCAD, Revit, and Sketchup, I admit pretty whole heartedly that Microsoft Office products should have a place in your software skills repertoire as well.
The big three: Word, PowerPoint, and Excel frankly just have a pretty firm place in most businesses even creative ones. These are also the programs that people tend to be most familiar with, having used them even before learning any design software.
The bad news is that not enough people know how to use these programs to their full potential. I’m a designer, and I know the value of design software. But frankly, you can do some amazing (and efficient!) things in Microsoft Office. And the amazing thing is that they all work together incredibly well.
A lot of designers tend to complain that documents created in Microsoft Office just aren’t as pretty as they want to be. To that, I will say that a number of things you can control in Word (or PowerPoint or Excel) in terms of graphics is limited or challenging compared to my favorite InDesign. That’s why for project proposals, brochures, and portfolios I will always suggest (if not demand!) they are designed and created in a program like InDesign. But frankly, not every document needs InDesign. And some need the more powerful spellcheck of Word, the incredible computation of Excel, and even the animations of PowerPoint (just not the cheesy ones okay?).
The good news is you can set up just a few things in your Microsoft Office suite to ensure you’re being the most efficient with this software in terms of graphics and design.
My top tips are to use theme colors and theme fonts.
This is an absolute game changer for me because you can suddenly make things fit in with your own branding or within the project design in a way you could never do with the default options in office.
Yes, you can certainly make these adjustments as you go along. But setting these up as theme options ensures the graphics are natural and automatic. This means you’re not constantly looking up the RGB color codes of your project palette, you’re not constantly scrolling through hunting for the font you’ve been using. This also means you won’t accidentally have some default Calibri in a footer or on a random slide. (No offence, Calibri, you just don’t belong on everything, you look default and I’m afraid designers need to be intentional.)
So here’s to step by steps for setting your theme colors and fonts in Microsoft office.
Step 1: Colors
Open Microsoft word. (If you have all office programs loaded on your machine you’ll only need to make this change once!)
Then go to the Design tab

From here you need to first click the down arrow by Colors.
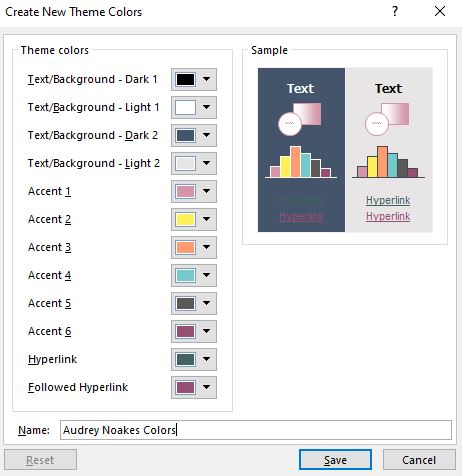
There a whole host of color palettes will appear. These are the default colors in Microsoft Word. But to add your own, click the Customize Colors… button at the bottom.
This will open up a new dialog box for you to input the colors of your new theme. You can choose text colors, accent colors, hyperlink colors, etc. There’s a small sampling of the colors that will give you a preview of the colors you’re choosing and how they look together. At the bottom, you can then give your new theme color palette a name to make it easy to find moving forward.
When you’re choosing a new color, just click the down arrow next to the color you want to change. You can choose from amongst the color palette there, but likely you’ll need to click More Colors… where you can choose your own color.
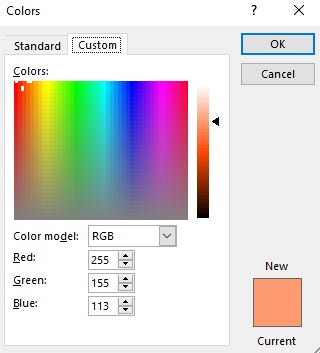
On the Custom color tab, you can choose from within the spectrum or enter an RGB color code for the desired hue.
If you’re choosing colors from an image, you can get the RGB color code either via Photoshop or using an online tool, like Image Color Picker.
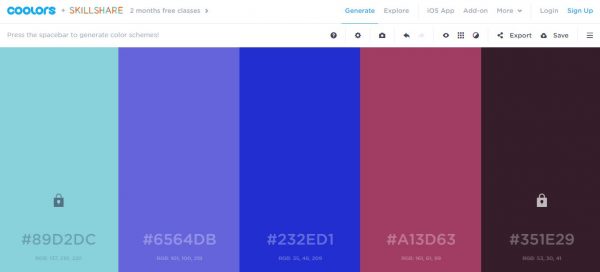
If you’re needing to develop a palette of colors from scratch, one of my favorite tools is Coolors.co.
Either with an iOS app or with their browser-based tool, you can experiment with colors until you find a palette that works well for you.
Now back to Microsoft Word!
When you’re done choosing your colors, click Save. You’ll find all of your custom palettes from the drop down menu of colors on the Design tab now. But to see it in action, after you’ve made your new custom theme palette, you can go back to the Home tab, click on the Text Color button’s down arrow and you’ll see the various shades of your theme colors appear. These colors will also appear withing any graphics, photo editing, etc. You can also find this theme color palette as an option within Excel and PowerPoint now, too. Suddenly, it’s incredibly easy to keep your colors consistent across multiple file types.
Step 2: Fonts
To set your theme fonts, it’s the same process. Go to the Design tab again.
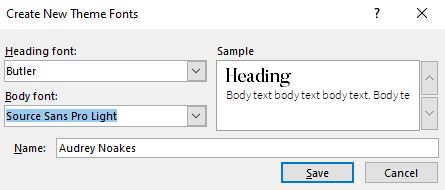
Click the down arrow, and you’ll see a host of options for theme fonts from Microsoft. To create your own, click Customize Fonts… at the bottom.
This will open up a new dialog box for you to choose a Heading font and a Body font from amongst the fonts loaded on your computer. You can also give your theme fonts a name where it’s easy to find next time.
Now if you need some suggestions on some good font combinations and the differences between Heading and Body fonts, be sure to check out this blog post.
When you’ve chosen your fonts, click Save. Now with this theme font selected, you’ll have the right two fonts ready to go as you work on your documents. You’ll never have to scroll through the long list of installed fonts to create consistently stylized documents. Instead, your top two choices will always be right there. And it will bridge from Word to Excel to PowerPoint.
That’s it. Those are two tiny little actions you can take to make your set up of Microsoft Office programs just a bit more seamless and efficient. Over the course of an entire project or over the course of your entire business, taking these initial actions can save you hours of editing and polishing time over time. It can also ensure that you and everyone else working on the same project can have consistent styling on the documentation.
Do you have any top tips for using Microsoft Office?