How to Get Started with AutoCAD for Beginners
So are you a bit overwhelmed on how to get started with AutoCAD for beginners?
This blog post is all about getting started, that is getting familiar with the interface and how it works. Then, it’s about getting started with your first drawings and how to actually start working like a pro faster than ever.
So let’s get started!
AutoCAD or AutoCAD LT
One of the questions that I hear most from beginners is should they use AutoCAD LT or do they need the full version of AutoCAD?
Well, in case you don’t know, AutoCAD LT is just the slightly lighter version [AKA cheaper version] version of AutoCAD. I really recommend AutoCAD LT especially for anyone working with spatial design, e.g. interior designers, interior architects, contractors, or renovators.
Working in the spatial environment, we really only need to use AutoCAD for its 2D capabilities. Yes, AutoCAD can do things in 3D, but there are other softwares out there that are more appropriate for that in my opinion (e.g. Sketchup or Revit). So if you only use AutoCAD for 2D drawings, why not stick to AutoCAD LT since it only has 2D capabilities.
AutoCAD LT is a fraction of the price and has nearly every single kind of feature you would need in a 2D drawing program. And frankly, it just works really well, and it means you’re still really compatible with all the other disciplines and professionals using AutoCAD.
Opening up the Program for the First Time
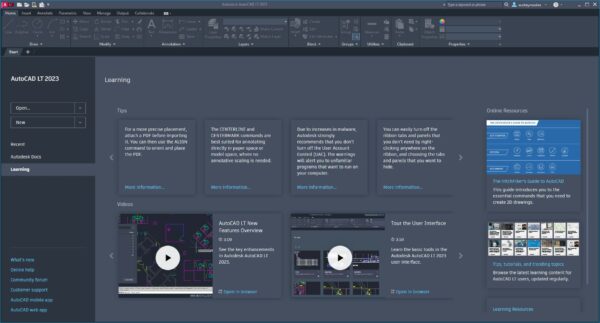
When you get started you’ll open up a screen that’ll look similar to this screenshot.
When you get started you want to make sure you open it up with the right template. So if you click the little down arrow next to New, you can choose a template.
I really recommend anyone who’s just getting started to use either the ACADLTISO or ACADISO if you have the full version of AutoCAD.
You can also download some CAD templates from online, like my CAD template for interior designers in the shop. Basically, using a good template means you have it set up in a way that it’s really usable for you.
However, if you’re just starting from scratch the ACADLTISO or ACADISO template will be really good to have.
The Basics of the Interface
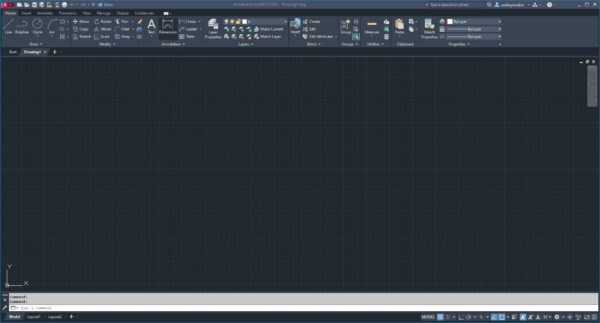
So when you open that first file, what you can see is just a really blank kind of space for us to get drawing in.
Let’s look at the basics of the interface.
Navigating the Drawing Area
First things first, when you open AutoCAD, you’re going to see this really big black background / grid area. This is called the drawing area.
Now the easiest way to navigate the drawing area is going to be if you have a really dinky scroll-wheel mouse. Do not think that you have to have anything fancy! A scroll-wheel mouse is so much better than a touchpad, and in my opinion a scrollable mouse is also better than like a fancy Mac mouse as well.
A scroll-wheel mouse gives you a lot of flexibility in quickly moving around the drawing area. If I scroll up, I can zoom and if I scroll down, I can zoom out.
So that’s basically pushing up on the wheel, the drawing area is going to get larger. Pulling down on the scroll wheel, the drawing area is going to get smaller.
When you have the scroll-wheel mouse, you can also hold down the scroll wheel, and it turns into a pan cursor. To pan means you can actually just move around without zooming in or out.
The Ribbon Menu
Once you have a little bit of familiarity about moving around this drawing space, what you want to do is go to your Ribbon menu.

So all of the things that you need in AutoCAD are going to be up here within these ribbon menus.
If you have full AutoCAD it will be that there’s a couple of different options up here including Express tools, but for right now the main ones you really need to get started are going to be all on the home ribbon. The home ribbon features the commands you’ll probably be using most as an interior designer.
Getting Started with Commands
So what is an AutoCAD command?
The commands are simply going to be what you get AutoCAD to do.
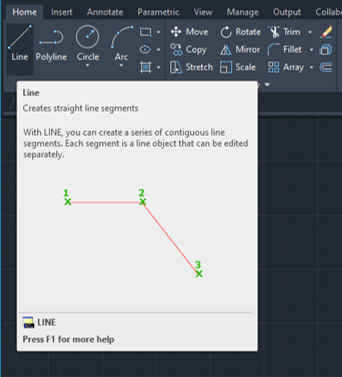
Line is a command that lets you draw a line.
Polyline is a command that lets you draw a line with more than one segment.
All of these are different commands. As a beginner, I recommend that you could click on these little buttons in the home ribbon to see what commands are available.
However, don’t get into the habit of using the buttons to activate the commands!
My best advice for beginners is to get started learning typed commands in AutoCAD.
Typed commands are going to make it where you can work a lot faster and just be a lot more efficient with using the software. You won’t constantly be trying to hunt for the little button for the command you need.
So what do we mean by typed commands?
If I just start typing the word line and press enter, I actually can then just start drawing some lines by clicking on two points in the drawing area on my screen. When I’m done just press enter, and we have some lines.
Now historically, you used to have to always type your commands in the command line at the bottom of the screen, that is this big bar. (If you don’t see it on your computer, that’s fine it sometimes will be floating in it’s own window, sometimes it’s docked at the bottom, and sometimes it disappears.) You don’t really need the command line as much anymore though, because now you can actually just start typing anywhere.
For example, click anywhere in the drawing area, and type ‘circle’, press enter, and you’ll actually be able to start drawing a circle.
You really want to get familiar with these typed commands because that’s going to be how you can make sure you’re working fast and efficiently with the software.
What commands should you know?
To get started, I recommend working through the draw category and modify category here.
If you’re learning on your own, hover over the buttons as this will help explain what the typed command is for this command as well as how the command works.
I’m going to say 99% of 2D drawings can be created with a lot of detail just using the commands in these two little panels.
If you want a cheat sheet for some good commands to work with, as well as a little piece of paper that you can cut out and put on either side of your computer screen I do have one in my Free Resource Library.
Using Layers in AutoCAD & Managing Properties
Once you get to grips with some of the commands, even as a beginner, it’s important to start using layers and managing their properties.
I recommend having two new panels on screen to use layers and manage properties efficiently.
- the layers properties panel
- the properties panel itself
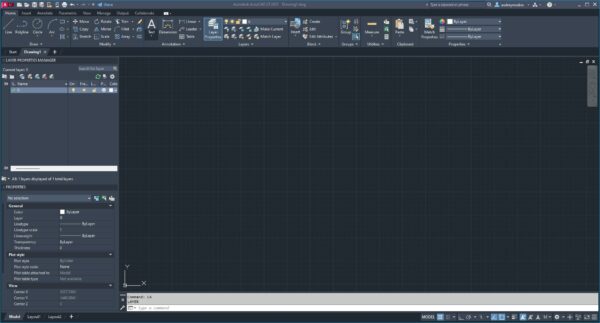
To make these panels appear, just start typing LA to finish it and just press enter, and the new layer properties manager panel shows up.
If I start typing PROP for properties and press enter, the new properties panel shows up.
Obviously at first, they may take over a lot of the screen. You can resize and drag these to be less obtrusive. In a Windows computer, you can dock them to side of your screen which is what I recommend.
So these two panels work hand in hand.
Layers are going to be as if you were drawing by hand – how you can start to organize different information on different ‘sheets’ that can be stacked on top of each other as needed to make a whole drawing.
For example, if you might need to draw any lighting separately, where you can have both a plan drawing with lighting symbols visible and a plan drawing with lighting symbols invisible. This can easily be achieved via a Lighting Layer.
Layers are also really helpful in organizing and managing information that needs to be represented with different line weights.
(Line weights are a whole different beast when it comes to interior design drawings – here’s a video that walks through this!)
All of that to say: Layers are important in AutoCAD.
In an empty file, your layer properties manager panel is going to look really boring. There’s going to be a layer zero which is the default layer, and then your properties are going to be all kind of set up for layer 0.
However, a good AutoCAD drawing in practice, will have a lot of different layers set up for different needs. Here’s a screenshot that shows some of the layers set up in the CAD template I sell in my templates shop.
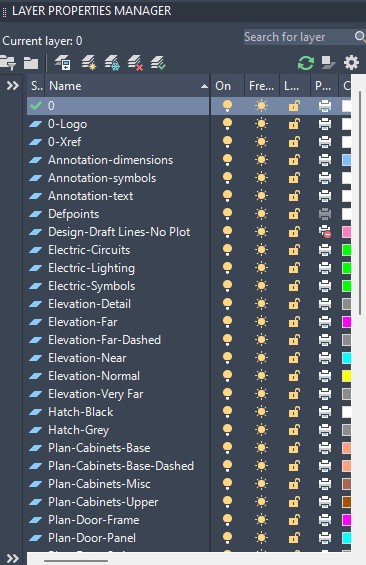
Layers can be set up to display in different colors. They can be set with set up with different line types, e.g. dashed lines, continuous lines, dotted lines, etc. You can set up transparencies, lock layers, etc. There are a number of different settings that can be controlled for a layer. Practicing and learning these different settings and what they can do will help make your drawings look better and be more effective.
If you start to use layers, it also means your drawings are more organized and more powerful. For example, with various layers being used effectively, you can set it up where you have a floor plan with all the walls and all the doors and furnishings as a general layout plan, but you might have a floor finishes plan, an electrical plan, a lighting plan, etc. All of these different drawings can be created from a single AutoCAD file when the layers are set up and used effectively.
Now I have a whole blog post on layers to help you get started. But the point is to just to get started with using them. You’ll optimize them and use them more effectively over time.
Now before we move on, I also wanted to clarify that properties are going to be the settings of an individual line or object in the drawing. I almost always recommend that any properties are set to ByLayer. You’ll avoid ‘chasing your tail’ so to speak when changes need to be made later on.
Settings for Drawing in Architectural or Interiors Work
Now to start focusing on drawing!
When you get started with drawing especially for any kind of architectural or Interiors work, I would really recommend making sure you have one of two settings turned on.
Either:
- Ortho mode – that’s going to mean you can draw nothing but straight across and straight up and down. Straight across and straight up and down lines very helpful for things like floor plans.
-or-
- Polar tracking on – This setting can be helpful because you can still lock it to a 90- or 0-degree angle, but you can also lock it to 45-degree angles or 30-degree angles and so on.
Making sure you use one of these two settings makes it where you can actually monitor the lines and the angles you’re drawing. If you just did it freehand, it’s gonna be really hard to make sure it’s perfectly set up. You could really get yourself into trouble too, especially when it comes to drawings for construction and things like that. You want to be as precise as possible, and you don’t need something to be accidentally drawn at a weird angle.
Setting Your Units
One more thing before you get started drawing is to check your units!
To check to make sure you’re drawing in the correct units for your design, all you need to do is type UNITS, press enter. This little window is gonna pop up, and this is where you can set things like your precision as well as the type of unit.
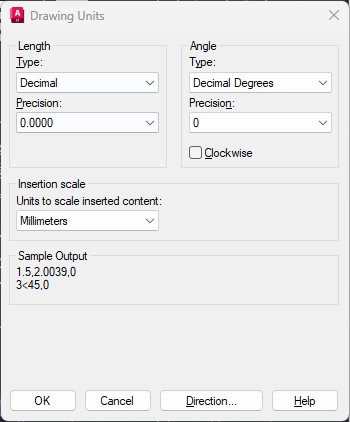
If you’re starting a drawing from scratch, always check that your drawing units are set to the units that you need to use.
Getting Started Drawing in AutoCAD
Now to actually get started with any drawing, all you need to do is start thinking through the different commands that you know (especially those draw and modify commands) and just start drawing. I recommend working from broad information to more specific. It’s generally good practice to draw the extents of the room before you start adding any furnishings.
AutoCAD doesn’t replace your own knowledge when it comes to design drawings though. You have to have some understanding of how these drawings are supposed to look. I always recommend researching consistently – what good plan drawings look like, what good section drawings look like, etc.
Saving Time with Blocks in AutoCAD
Now at a certain point, to save yourself time, it will be good practice to start using CAD blocks. CAD blocks are are essentially groupings of different lines and other drawing elements. This can be as simple as a CAD block that’s a chair, a CAD block that is an editable title block, or a CAD block that’s the layout of an entire apartment.
In my own CAD template, I have a lot of different blocks set up, such as door blocks, some furniture blocks, blocks for objects in plan and in elevation, etc. Essentially, I just have a selection of commonly used things that are easy for me to grab and insert and use within my drawing.
You can make your own blocks, but you can also download blocks from manufacturers or other sources online.
Whether or not you download a lot of blocks to use, it is important to remember that you can draw things from scratch when you need to. Blocks can make your life easier, but don’t spend hours searching for a block to be perfect when it would have been easier to just draw it yourself anyway.
Drawing at 1:1 in AutoCAD
When you start drawing in AutoCAD, it’s important to keep in mind that you’re drawing in 1:1. So if you need to draw a 5 foot long line, you draw a 5 foot long line. The model space of the drawing is infinite, so don’t worry about running out of room. You don’t have to do any math or scaling from scratch in AutoCAD. This can be done later when you go to print.
Annotations in AutoCAD
Only when you get ready to add annotations do you want to adjust the scale.
If you go to the bottom right corner, this is the option for setting the annotation scale.
The annotation scale is not the scale of the drawing, it’s the scale of any annotation.
I have a whole video on annotation scale and how to consider it. It can be something that’s a little bit more complex, so I highly recommend reviewing that video.
In summary, though, if you draw everything out, you want to draw it one to one, but when it comes to adding any dimensions or text, you would want to go and change your annotation scale to the relevant scale that the drawing is going to be presented at. Then, if you use an annotative text style or annotative dimension style, it will automatically size correctly for that scale drawing – this helps you avoid extra huge or extra tiny text!
Setting up Your Layout in Paperspace
Now that you have a drawing, let’s take it into paper space.
This highlights a key point – when you’re drawing in the drawing area with the dark background (It’s usually dark, but you can change it if you want too – see video!) this is called model space
When you’re ready to set up the drawing for print or PDF, you take it into paper space.
Paper space is just going to be if you click the various default layout tabs in the bottom left corner of the drawing area. This then shows what looks like a piece of paper that has a window into the model space. This window is called a viewport.
Now, if you double-click into the viewport, you can actually pan and zoom in and out as if it was in model space. If you double-click on the outside, it’s just a piece of paper again.
If you go to print this layout as-is, it’s important to note that it would not be to scale. PLUS it would look kind of crappy.
In order to make a nice looking drawing, you want to set up your layout properly. If you just type ‘page setup’ and press enter, this will activate the page setup command. Like almost any other program in the world, this means you can adjust the setup of page to ensure it prints as intended.
Some adjustments I typically recommend:
- Select the DWG to PDF printer/plotter – It’s generally good practice to print to PDF first.
- Choose a full bleed page size
- Choose the monochrome plot style – this is a default – plot styles can be customised but monochrome is great for beginners because it prints black and white and only i9n colour if you pointedly tell AutoCAD to.
- Check ‘Display Plot Styles’ – this gives you a nice print preview!
Once you click OK and close the page setup window down, you’ll see your new layout all set up as intended.
At this stage, I recommend adding a title block or something to help formalize the drawing a bit more. You can download some off the internet (like the ones in my shop!) or you can draw your own.
The title block then gives you an opportunity to add key information like projects, dates, your name, etc.
Next you need to set the scale of the drawing. When you go back into your viewport, this time when you go into the bottom right corner, you can actually set a specific scale. Importantly, when you’re in paper space, this option isn’t the annotation scale. Instead, this is going to be the actual scale of the drawing according to the page size that you’ve set up.
And with that, if you type PLOT and press enter, you can print a PDF of your newly created drawing.
Now obviously, this is just a few key steps to get started! AutoCAD can be an incredibly beneficial program but it can be complex, so you want to make sure you get to grips with the basics to help ensure you can maximize your opportunity in using this software for your interior designs.
If you want to learn more about AutoCAD and get to grips with all the core skills plus key workflows, then take a look at my AutoCAD for Interior Designers Course. For anyone, who made it to the end of this blog post – it was a doozy! – you can use the coupon code BLOGACAD at checkout for $100 off the regular price. (The deets: this coupon code can’t be used in conjunction with any other discounts and is only valid for AutoCAD for Interior Designers course purchases).
[elementor-template id=”13556″]