I re-branded and re-did my website a few months ago. Did you notice? I did and I’ll admit I’m proud of the result, but honestly I’m a bit more proud of what I learned in the process.
Of course, if you have the resources, just as it’s worthwhile to our clients to invest in an interior designer, I definitely recommend investing in a pro for your branding and website design if you can. But the reality is that not everyone can afford a professional. There are some excellent tools out there that can help you do-it-yourself when you need to.
So what are the key lessons I learned?
Here’s a rundown.
- You must have a pretty specific plan
- It always helps to get some guidance
- It always helps to get a second opinion
- Be organised in developing your content
Because I wish I had a more detailed plan of attack when I started, I wanted to share my step by step process with you all, too.
It ended up being a big ole list, so I’ve broken it up. Below you’ll find Part 2, all focused on the website side of the re-design.
PART 2: Website Design
Now I was ready to put this new brand into action. First things first, I made myself a little sheet sheet where I listed each font and color that I would need for the website.
My website uses Playfair Display, EB Garamond, and Source Sans Pro as these fonts are available on Google fonts, and they’ll display well on most screens, browsers, etc.
Next, I needed to make note of the Hex colors of my new brand colors. Important to know is that websites won’t use how we normally think of colors, that is by name, by RGB (Red-Green-Blue) code, or by CMYK (Cyan-Magenta-Yellow-key/blacK). Instead, they use the hex codes.
Fortunately, Adobe products like Photoshop or InDesign* make it pretty easy to find the hex code of the colors you’re using.
In the color picker, when you have the color of your brand selected, you just want to look in this bottom box for a series of letters and numbers. That will be the hex code.
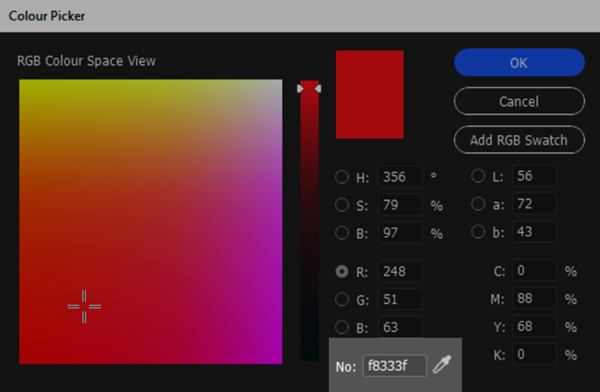
Then all you have to do is make note of the hex codes of the various colors you’re going to use. This will make when you go to edit and design the website so so so much easier.
So my color cheatsheet was:
- Red #f8333f
- Yellow #eebb0d
- Grey #d9d5d2
- Gold #9f854c
- Rust #cc7749
- Pink #f9c19e
- Teal #589e8f
- Green #367252
- Brown #3b302e
- Navy #182d35
- Forest #022f32
Structure
Now before I got started in actually making the website, I gave myself a clear outline of how I wanted to structure the site. Basically, before you have an actual site map, you need to have a plan of a site map.
If you use WordPress like I do (more on that in a minute), there’s some broader categories of how things get published on the site. For my theme, it’s really just pages and posts. For some themes out there or depending on how your site will be set up, this might also include projects, portfolios, products, etc. But for simplicity’s sake, you can just start with Pages and Posts.
Posts is obviously a bit more straightforward as this is just my blog posts.
Pages required a bit more thinking about what was needed and what was included as part of the hierarchy of the overall site.
Here’s what I ended up with as a starting point.
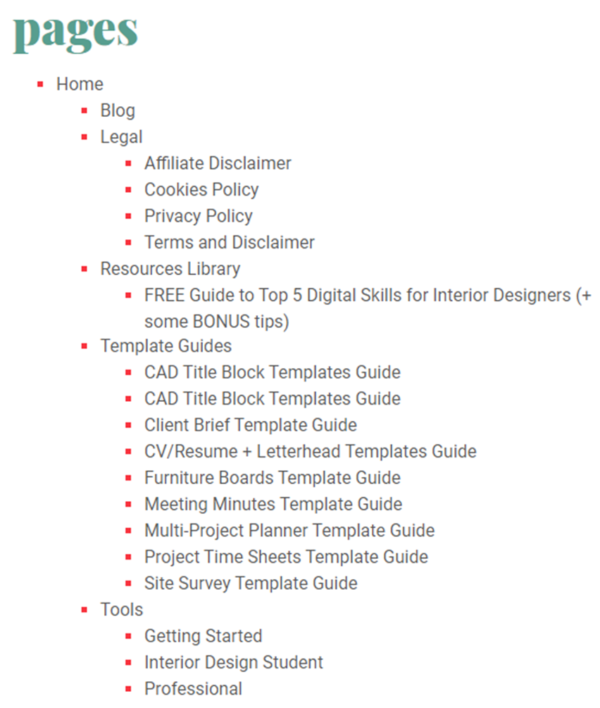
I obviously need to consider my blog feed, all the legal pages, my resources library, the template guides for people who purchase from my shop, and my tools pages.
For you this might be pages under services, projects, testimonials, etc. The key is to give yourself an outline as that makes developing the design of the site so much easier.
WordPress, Domain Names, and Webhosting
Now that I had my structure planned, I could actually start working on the website. I use WordPress as my platform as I’m familiar with it, and I know it works well for blogs like mine in terms of search engine optimization (SEO). It also has a lot of online tutorials and how-tos out there, so it felt much easier to DIY a customized website with this platform.
I do use WordPress.org though, not the .com. The WordPress.org version is downloadable, and you can install it directly onto your website on your own host.
That’s when I need to set up with my host. WordPress as a means of building your website is free. But your hosting, that is where on the internet your website is held will cost some money. I already owned my domain name, that is audreynoakes.com, but I knew as part of my website re-design I wanted to switch hosts.
(If you don’t already have a domain name for yourself, I really recommend Namecheap*. They have a super simple interface, and the available domain names usually have a really good price.)
I won’t mention who used to host my site, but I definitely became a bit disappointed in their service recently. A long time ago, I had used Bluehost* as a web host, and they had worked really well. But then I ‘upgraded’ to another one that just wasn’t quite up to scratch for me.
So now I’m with Kinsta. They were a bit pricier than my older plans, but they have been great in terms of service and ease. My site also works really well with them. So win-win and worth the investment.
Website Builder
So now that I had my new webhosting, and WordPress was installed. I could get down to the actual designing of my website.
This is where I did a lot more research.
WordPress has a number of really great themes, both free and paid, that can give you a great looking website without too much effort.
But I’m a designer at heart, and I really wanted the ability to customize my pages to look exactly how I want. Themes designed by others tended to be a bit more rigid and didn’t have the flexibility that I wanted.
This is when I discovered Elementor*.
Elementor is a website builder that’s a single plugin on WordPress.
There are definitely others out there. For my old site, I used Site Origin’s Page Builder. It worked for me at the time and was completely free which definitely made it appealing. My husband also has a website and they use Divi which is another highly customizable theme/plugin for WordPress.
But I chose Elementor*, because in my research, I found 4 key factors that I was looking for in a website builder.
- It would make a fast site. My old site (probably due to some of my own errors as well) was much slower than I would have liked it to be. And Google hates slow sites, so I really needed to speed things up with the new website design.
- It was easy. Elementor was so much more intuitive to me than the others out there. I watched a few videos on Youtube, but was able to pretty quickly do everything I wanted without needing instruction.
- It allowed me to build my own theme. I really liked this feature as basically, I could set up templates for all the types of pages and posts I’d need on my site and have them ready to go when they were needed.
- It’s affordable. I’m still DIY’ing this site, so I needed to make sure all the tools and plugins I needed weren’t going to cost too much. Elementor was the answer because they have both a free version and a highly affordable Pro version. At the time of this blog post, I spend less than $50 per year on the Pro version of Elementor. Comparing that to the $90 or $100 charged by some of the other premium website builders, when I’m on a budget, the $50 Pro version of Elementor was a no brainer.
So how did I end up using Elementor.
Let’s look at my blog post template as an example.

Here you can see there are columns and an overall layout that I’ve decided (They have some great templates too if you don’t want to start from scratch).
I could drag and drop various elements that would exist for each blog post, such as a title, the content, a featured image, etc.
Then I could set the specifics of each of these elements, such as size, color, spacing, graphics, etc. Then once I was done, I could then apply this template to all past and future blog posts automatically.
It was so easy.
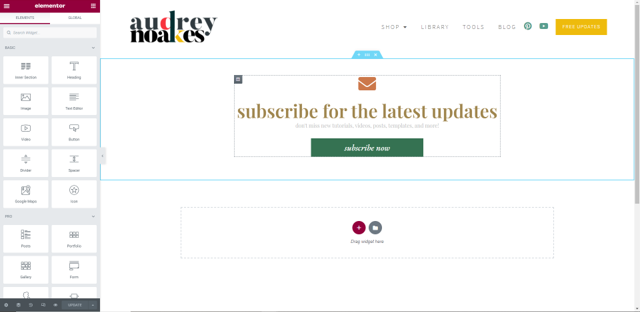
Another of my favorite features in Elementor is that you can set up ‘templates’ or elements in your website that you know you’ll end up using over and over.
For example, I invite my readers to join my email list in a lot of places on my site. So with Elementor I was able to create one styled, branded template for inviting people to my email list that I could then add anywhere and over-and-over again on the site. This makes that brand consistency really easy, and it makes it easy for you to really capitalize on the traffic your website receives.
For example, imagine you had an Elementor template for inviting a potential client who’s landed on your site to book an introductory call or fill out an inquiry form. Imagine how easy it becomes to put that same template of a ‘call-to-action’ in a lot of different places on your site. In fact, you could put it in all the places a potential client might end up with just a few clicks. It’s such an amazing feature!
I won’t get into a complete how-to about Elementor*, but needless to say, I’m a big fan. If you’re interested, they have a number of free how-tos on their very helpful Youtube channel.
So that’s it, that’s Part 2 of my DIY Branding and Website project. If you missed Part 1 check it out here.