30-Minute Photoshop Fix – Volume 2
How to add color and texture to a floor plan drawing in Photoshop
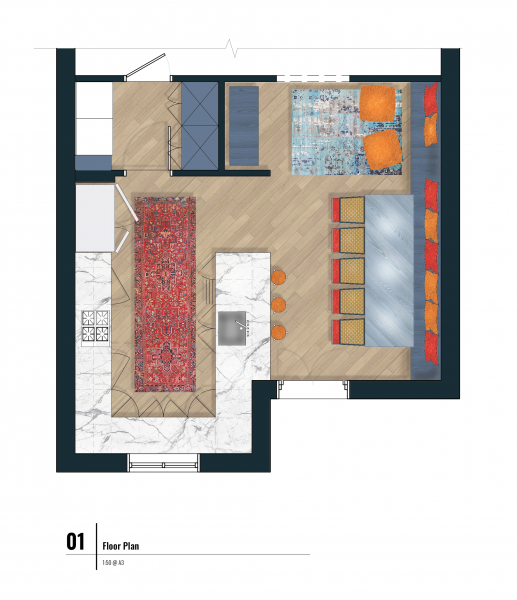
The reality of design work day-to-day is that you have to work quickly and effectively both to meet deadlines and showcase your talent. So having an arsenal of workflows you can use project after project for creating good work quickly is a real asset for the working professional. So this tutorial is intended for someone who is producing CAD drawings of their designs and who has a basic knowledge of Photoshop. You’ll also need to have already made your design decisions. I do use some shortcuts which I outline below, but after a few practice runs, this step-by-step will become one of your favorites in creating beautiful presentation drawings quickly. So what are we going to do? We’re going to create this transformation.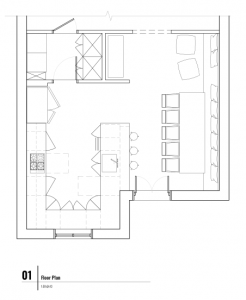

Step 1: Bring PDF of CAD Drawing into Photoshop
First, open a new Photoshop document (PSD), the size of your drawing. In my case, I opened up a PSD that was the size of the A3 paper my drawing was set out on. Then go to place the drawing into the PSD. Go to File, then choose Place Embedded. Find the PDF of your plan drawing that you want to edit, and place it in the file.
Step 2: Add Layer for Floor
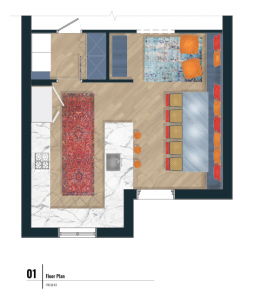
Now that you have your floor plan drawing in the file, you need to create a new layer. This layer will become your flooring. Create a layer with the Plus button in the layers panel. (Rename it the flooring layer if you want to be organized!). Now we need to put a fill color on the areas of the drawing that will need to have flooring. To do this, we’re going to use the Magic Wand tool (W). Select the original drawing where it’s the active layer, then use the Magic Wand tool to select all areas of drawing that are the flooring. (Hold down the Shift key to add to your selection). When you’ve selected all of the areas that are flooring, select the new flooring layer to make it active. With this layer active and your selection still active, go to the paint bucket tool (G). Use the paint bucket tool to fill the selection with a color. Because our flooring texture will be an opaque image, this can be any color. Your drawing will likely look something like this now.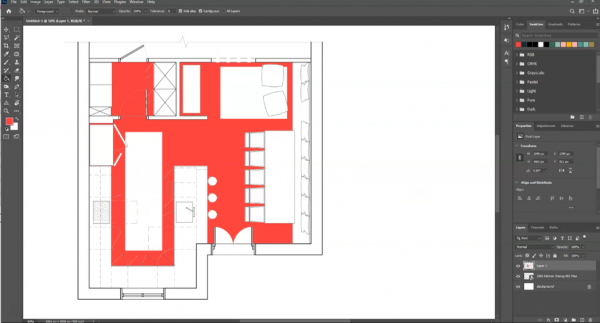
Step 3: Create Pattern for Floor
So now you need to create a pattern for your floor. I love using downloadable seamless patterns from Sketchup Texture Club. To make sure, I work efficiently, I’ve already saved all the textures I’ll need in the folder I’m using for this drawing. This may be something you’re already doing as you work on creating the design for the space. So for this design, I’m using a muted wood floor. So I’ve downloaded that type of pattern from the Sketchup Texture club. To make this image into a pattern, you just need to open the image in Photoshop. Then go to the Edit menu, and select Define Pattern. When you define the pattern, it will be helpful to go ahead and give it a recognizable name.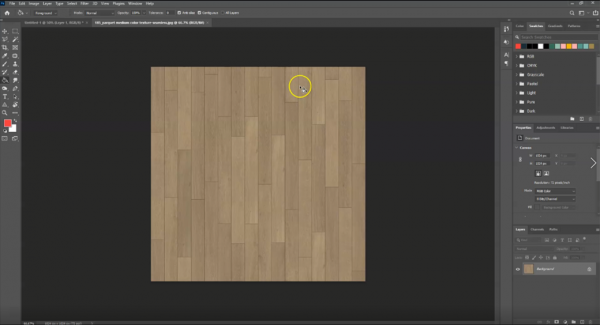
Step 4: Apply Pattern for Floor
Now that you have defined the flooring image as a pattern, you just need to apply it as an effect. To apply the pattern, you need to select your floor layer, then click the ‘fx’ button in the Layers panel, then choose pattern overlay. Here you can then choose the pattern, you just created to apply to the flooring layer. Of course, you’ll likely need to adjust the pattern and scale to fit your design. But when you click OK, you’ll have a flooring pattern applied across the flooring layer.
Repeat Steps 2 through 4 for any additional textures or materials.
These first few steps are honestly just a ‘rinse and repeat.’ Do these 3 steps over and over for any material or texture that needs to repeat on the drawing.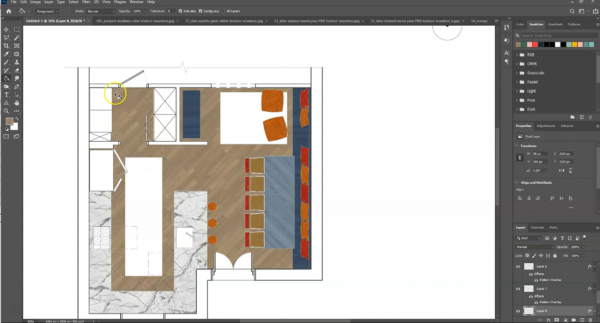
Step 5: Add Rugs or any other materials/colors
Now not every texture in a design will be a repeated pattern like the wood flooring. So those can simple be added as their own image. Here, I add two rugs, by going to File, then Place Embedded. I chose the image file of the rug I’m proposing. When placed, I grab the transform points to resize it to fit into the design. I do this for both rugs in the space.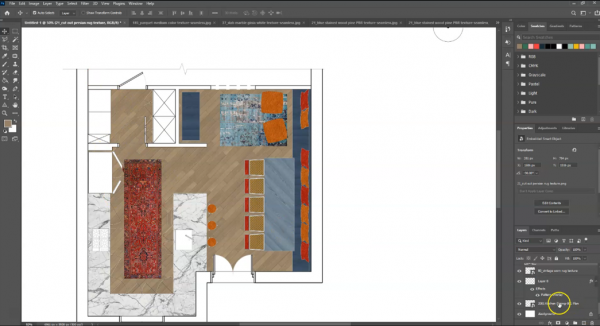 I also wanted to fill in some of the other areas, with basic colors to fill out the rest of the drawing.
For this I simply create a new layer, then use the same technique with the original drawing and the Magic Wand tool to select areas that I want to fill in with a specific color using the Paint Bucket tool.
I also wanted to fill in some of the other areas, with basic colors to fill out the rest of the drawing.
For this I simply create a new layer, then use the same technique with the original drawing and the Magic Wand tool to select areas that I want to fill in with a specific color using the Paint Bucket tool.
Step 6: Add Main Shadows
The bulk of the drawing has its color and texture now, but it will still look a bit flat until we add some lighting effects. The easiest way to add main shadows is to apply an inner shadow to the floor layer. This is done by clicking ‘fx’ on the Layers panel while the floor layer is selected, then choose Inner Shadow. You’ll need to play around with the opacity, angle, distance, etc. to make it look suitable, but very quickly you can add some lovely depth to the overall drawing.
Step 7: Add highlights and lowlights
Now we want to add a few more lighting effects. To do this, we’re first going to create a group out of all the layers (except the drawing) that we’ve used so far. So select all of those layers, then use Ctrl/Cmd + G. Now I want to retain all the layers and information in those layers, so I’m going to go ahead and duplicate that layer by using the Ctrl/Cmd + J shortcut. Now, I want to flatten that second copy of the group. So I right-click on the group and then click merge group. Now that I have this layer, I’m going to use the dodge and burn tool to create highlights and lowlights in the plan. The dodge tool is a tool that will lighten areas of the drawing to create highlights. The burn tool is a tool that will darken areas of the drawing to create lowlights. Here, I’m using these tools to create highlights from pendants, show the curvature of cushions, and adding more shading at the banquette seating and even the sink.
Step 8: Final touches
Now you’re ready to add your final touches. Some typical adjustments I like to do at this stage is to adjust the brightness and contrast, as well as adjust the lightness. To do this, I go to the Image menu, then choose Adjustments, then choose Brightness and Contrast to edit those settings. Then choose Hue, Saturation, and Lightness to adjust that setting. This makes the color and textures look a little more stylized for presentation. Another final touch is to add any styling to the overall sheet. If the drawing is going on a darker background, I definitely prefer keeping the walls with the white fill. However, in this case, because it’s going to stay on this white sheet, I’m going to fill the wall with a key color. Do this, I’m going to create a new layer, but then select my old drawing layer. Then I use the Magic Wand tool to select the areas of the walls to fill. Then I use the Paint Bucket tool to fill this selection on the new layer I created.
Step 9: Export and present!
And your done and ready to save and present your drawing. I usually save my drawings as either a JPG or PNG. But sometimes a TIFF or Photoshop PDF will be suitable. To do this, go to File and click Save As and choose the relevant option (or choose export for PNG). So in less than 30 minutes, you can take your plain black and white drawing of the design and make into a vivid presentation tool to give your client a better idea of the design you’re proposing.